A Read-Eval-Print-Loop (REPL) is an interactive program that reads your input, evaluates it, prints the result, and loops back to the beginning. It’s a great way to experiment with a programming language and an excellent method for learning a new language. C# has many REPLs; some are web-based, others are desktop applications, and some are command-line tools. There’s .NET Fiddle, Try .NET, the popular LINQPad, the built-in csi.exe, and many more.
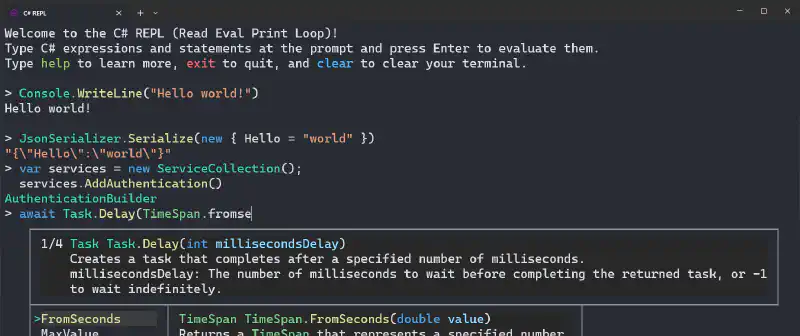
But there’s one C# REPL that I find above all others. It runs in your terminal, is easy to install, and easy to use. The included Intellisense, documentation and suggested overloads increases productivity. It supports theming, and when I use this REPL, I almost feel like I’m coding in a regular IDE. I always have a terminal open, so it’s very convenient to have such an advanced C# REPL in it, available in a few keystrokes.
The C# REPL I’m talking about is simply called… C# REPL. It’s an open-source project created by Will Fuqua, and as of today, it has over 2k GitHub stars. It is distributed as a .NET tool and is cross-platform. In this blog post, I’m going to show you how to install it on Windows Terminal, but you can install it on any terminal emulator you prefer.
Here’s a full feature list, taken from the project’s README:
- Syntax highlighting via ANSI escape sequences
- Intellisense with documentation and overload navigation
- Automatic formatting of typed input
- NuGet package installation
- Reference local assemblies, solutions, and projects
- Dump and explore objects with syntax highlighting and rich Spectre.Console formatting
- OpenAI integration (bring your own API key)
- Navigate to source via Source Link
- IL disassembly (both Debug and Release mode)
- Fast and flicker-free rendering. A “diff” algorithm is used to only render what’s changed.
Installing and customizing C# REPL
The first step is to install C# REPL as a .NET tool. You can do that by running the following command:
dotnet tool install -g csharprepl
At this point, you can run csharprepl to begin. C# REPL can be updated with dotnet tool update -g csharprepl.
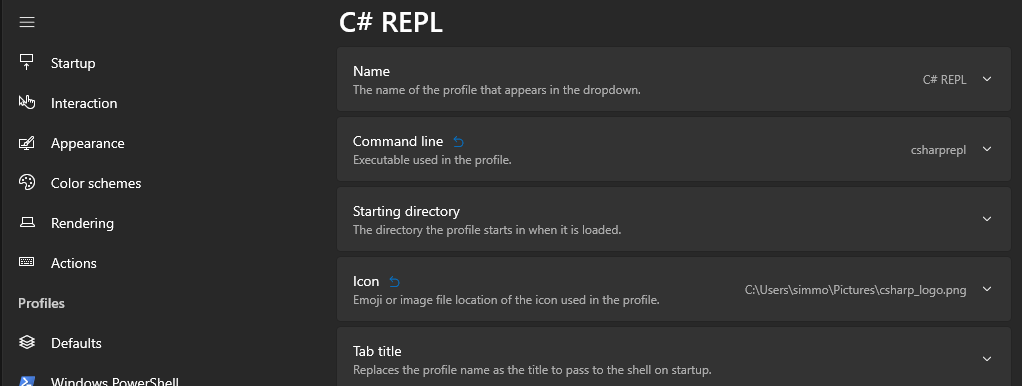
Next, you’ll want to create a new, dedicated Windows Terminal profile for C# REPL. Open Windows Terminal, click the down arrow icon, and choose “Settings”. Then, click “Add a new profile”. Give it a name, like “C# REPL”, an icon if you want, and set the command to csharprepl. Here’s how it looks:

C# REPL comes with many arguments you can use to customize it. Check the full list of arguments by running csharprepl --help. Some of the most useful ones are:
--using|-u: Add using statement, so you don’t have to type the full namespace.--reference|-r: Reference assemblies, NuGet packages, and csproj files.--framework|-f: Reference a shared framework, like ASP.NET Core (Microsoft.AspNetCore.App), .NET Desktop (Microsoft.WindowsDesktop.App), or the default option, .NET Core (Microsoft.NETCore.App).
My personal setup references the ASP.NET Core framework and adds a few using statements I often use. Here’s how it looks:
@echo off
csharprepl -f "Microsoft.AspNetCore.App" -u "System" -u "System.Collections.Generic" -u "System.IO" -u "System.Linq" -u "System.Net.Http" -u "System.Threading" -u "System.Threading.Tasks" -u "System.Net.Http.Json" -u "Microsoft.AspNetCore.Builder" -u "Microsoft.AspNetCore.Hosting" -u "Microsoft.AspNetCore.Http" -u "Microsoft.AspNetCore.Routing" -u "Microsoft.Extensions.Configuration" -u "Microsoft.Extensions.DependencyInjection" -u "Microsoft.Extensions.Hosting" -u "Microsoft.Extensions.Logging" -u "System.Text.RegularExpressions" -u "System.Text.Json"
Then, create a Windows batch file and select it as the command to run instead of csharprepl in the Windows Terminal profile settings.
What do you think about C# REPL in the terminal? Do you have other favorite REPLs or suggestions to enhance the experience? I’d love to hear your insights and recommendations in the comments!
